Help:Common-Images: Difference between revisions
added content |
m spaced the first paragraph |
||
| Line 3: | Line 3: | ||
Images allows you to attach files to items within the database. Despite the name, you can attach any file type and use the [[Help:Common-Extension_Maintenance|Extensions]] &<nowiki />amp; [[Help:Common-File_Action_Maintenance|File Actions]] screens to manage how you open them. This feature is currently available in Customer Service / Dispatch Manager (DM1) and Warehouse Locator Manager (WLS). In DM1, you can attach images to Jobs. In WLS, images are attached to Lots and are Company specific. | Images allows you to attach files to items within the database. Despite the name, you can attach any file type and use the [[Help:Common-Extension_Maintenance|Extensions]] &<nowiki />amp; [[Help:Common-File_Action_Maintenance|File Actions]] screens to manage how you open them. | ||
This feature is currently available in Customer Service / Dispatch Manager (DM1) and Warehouse Locator Manager (WLS). In DM1, you can attach images to Jobs. In WLS, images are attached to Lots and are Company specific. | |||
Revision as of 18:15, 1 August 2014
Images allows you to attach files to items within the database. Despite the name, you can attach any file type and use the Extensions & File Actions screens to manage how you open them.
This feature is currently available in Customer Service / Dispatch Manager (DM1) and Warehouse Locator Manager (WLS). In DM1, you can attach images to Jobs. In WLS, images are attached to Lots and are Company specific.
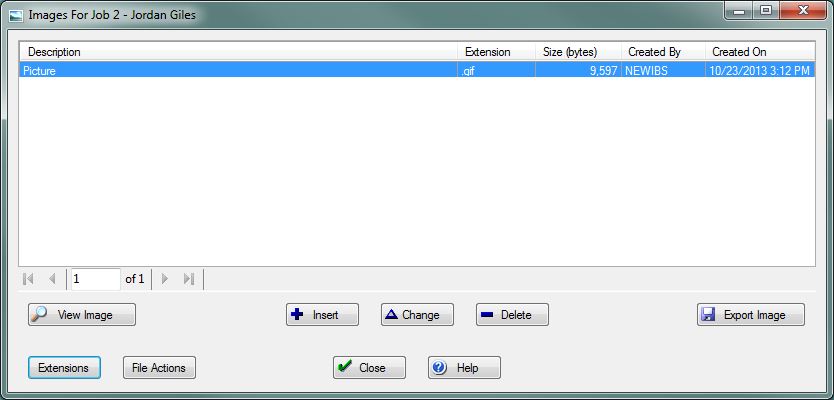
View Image: Use this button to open the currently selected image according to it's corresponding File Action. If no File Action is found then there are 2 default actions depending on the file's extension. If the file is an Image (.jpg | .jpeg | .gif | .png | .tif | .tiff | .bmp) then the internal Image Viewer will open. Otherwise the file will be opened by the Operating System (Windows). This is similar to double clicking or right-click >> Open on the file. The default program for the selected file will open or the user will be prompted to select a default program.
Insert: Use this button to open the Add Image screen and insert a new image record. You will be prompted to select an existing file to add.
Change: Use this button to open the Change Image screen and edit an existing image record. Please note that you cannot edit the actual file from this screen. To replace an attached image you will need to Insert the updated file, copy the Description & Notes from the existing image, and finally, delete the old image.
Delete: Use this button to remove the image record and delete the file itself from the file system. You will be prompted Yes or No to deleted the selected image.
Export Image: Use this button to export the selected image to a specified location on the file system. You will browse to your preferred export location. The Description and Extension are automatically filled out in the "File Name" textbox.
| Important: We suggest you leave the File Name as is when you are exporting an image. Changing the extension could render the file unusable. |
Extensions: Use this button to open the Extensions screen and manage the known file extensions.
File Actions: Use this button to open the File Actions screen and manage the different ways to open specific extensions.
File:CloseButton.PNG Press this button to return to the previous screen.
File:HelpButton.PNG Press this button to call the Help Screen.
