Help:SET-Join Jobs on File Number: Difference between revisions
No edit summary |
No edit summary |
||
| Line 68: | Line 68: | ||
{{Important tip|Narrowing the affected Jobs by Service Type is only effective for Van Line Jobs where the Service Type is under program control. For all other Service Types , we suggest selecting 'Include All Services' from the drop-box for the most reliable results.}} | {{Important tip|Narrowing the affected Jobs by Service Type is only effective for Van Line Jobs where the Service Type is under program control. For all other Service Types , we suggest selecting 'Include All Services' from the drop-box for the most reliable results.}} | ||
'''Active Jobs Only:''' Check this box to only include active Jobs in the | '''Active Jobs Only:''' Check this box to only include active Jobs in the analysis. | ||
'''[Analyze]''' Press this button to start the Job analysis. The results are collected below in the Duplicate File Numbers collection. | '''[Analyze]''' Press this button to start the Job analysis. The results are collected below in the Duplicate File Numbers collection. | ||
Revision as of 19:34, 14 August 2013
| Important: This as an advanced Setup feature that requires Support Login to access. |

This option is used to join Master Job records after a Van Line Agent has completed a Multi-Company conversion.
Permissions
You will be prompted to log in using the Dispatch Log In screen. The DM1 password record must have the following permissions set:
| Permission | Description |
|---|---|
| 01 | Access All Companies |
| 09 | Edit Company Jobs |
| 18 | View Completed Jobs |
| 19 | Remove Shipments |
| 41 | Access Jobs For All Coordinators |
| 51 | Edit Work Tickets |
| 56 | Access Work Tickets For All Dispatchers |
Note: We suggest giving the User full DM1 permissions.
Form Layout
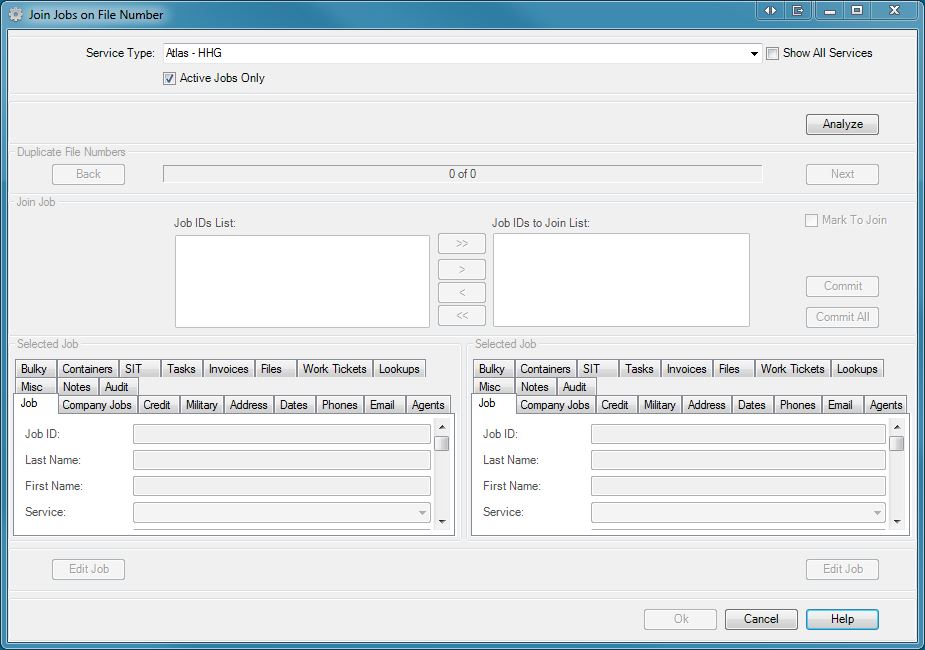
Service Type: Use this drop-box to select a specific Service for the initial Job analysis. Select 'Include All Services' to remove this filtering.
Show All Services: Check this box to include all services in the Service Type drop-box, including non-program controlled. (Service ID 100+)
| Important: Narrowing the affected Jobs by Service Type is only effective for Van Line Jobs where the Service Type is under program control. For all other Service Types , we suggest selecting 'Include All Services' from the drop-box for the most reliable results. |
Active Jobs Only: Check this box to only include active Jobs in the analysis.
[Analyze] Press this button to start the Job analysis. The results are collected below in the Duplicate File Numbers collection.
[Back] Press this button to navigate backwards one item in the Duplicate File Numbers collection.
[Next] Press this button to navigate forwards one item in the Duplicate File Numbers collection.
Job List: This list displays the Job IDs for the shipments that ARE NOT to be joined. Click on a Job ID from this list to select. The selected Job will be displayed in the Job control directly below the list.
[ >> ] Press this button to add all of the Jobs to the Join List
[ > ] Press this button to add the selected Job to the Join List
[ < ] Press this button to remove the selected Job from the Join List
[ << ] Press this button to remove all of the Jobs from the Join List
Join List: This list displays the Job IDs for the shipments that ARE to be joined. Click on a Job ID from this list to select and click a second time to toggle the item's checkbox. Only one item may be checked at a time and this indicates that the checked Job is the 'master', the base job that will retain all of it's records when the changes are committed to the database. The selected Job will be displayed in the Job control directly below the list.
Mark To Join: Check this box to indicate that your selections in the Join List are final and ready to be committed to the database.
[Commit] Press this button to commit the current Join List to the database. See below for the affected tables and fields.
[Commit All] Press this button to commit all uncommitted Join Lists that have their Mark To Join box checked.
Selected Job Use these controls to view the selected Job's raw data from all tables involved in the joining process.
[Edit Job] Press this button to edit or view (finished jobs) the corresponding Selected Job using an IBS Company Job screen.
Multi-line Tabs: Check this box to view the tabs in the Selected Job control on multiple lines. Otherwise the tabs will be displayed on a single line with scroll buttons for navigation.
[OK] Press this button to verify the user information that you have entered and return any exceptions.
[Cancel] Press this button to close this window and return to the previous screen.
[Help] Press this button to call the Help Screen.
Procedure
- Select a specific Service from the drop-box
- Press the [Analyze] button to begin the Job analysis according to the following criteria:
- Jobs must be of the specified Service Type unless 'Include All Services' is selected
- At least 2 Jobs must be found with duplicate File Number
- At least 1 of the found Jobs must be active if 'Active Jobs Only' is checked
- At least 2 of the found Jobs must have different Company/Branch IDs
- A progress bar will appear to the left side of the [Analyze] along with a counter for the number of Jobs analyzed. The rest of the form will be disabled during the analysis but you can still press the [Cancel] button at the bottom of the form to abort the process. You must restart from step one if you cancel.
